Beauty
7 Nail Art Ideas You Can Actually Do Yourself
Bookmark for when you (or your wallet) can't make it to the salon
Of all the beauty tips and tricks that can be DIY'd, successfully executing at-home nail art is notoriously not an easy thing to do. That's not to say it's impossible though, as made evident by a handful of talented nail artists, often appearing on the Instagram explore page with looks they say aren't as difficult to accomplish as they may appear.
Whether you're stuck at home, trying to cut back on your nail salon visits for financial reasons, or both, extremely cute and seemingly intricate nail art designs that even the most novice-nail painter can handle on their own do exist. To highlight some of the best, NYLON spoke to a handful of experts for their take on which nail art designs are the most DIY-friendly and step-by-step advice on how to get them done.
Thankfully, you won't need a full salon's worth of tools either. Most of the looks below can be accomplished with a simple brush and common household items, like bobby pins and Q-tips.
Check out seven easy at-home nail art ideas, below.
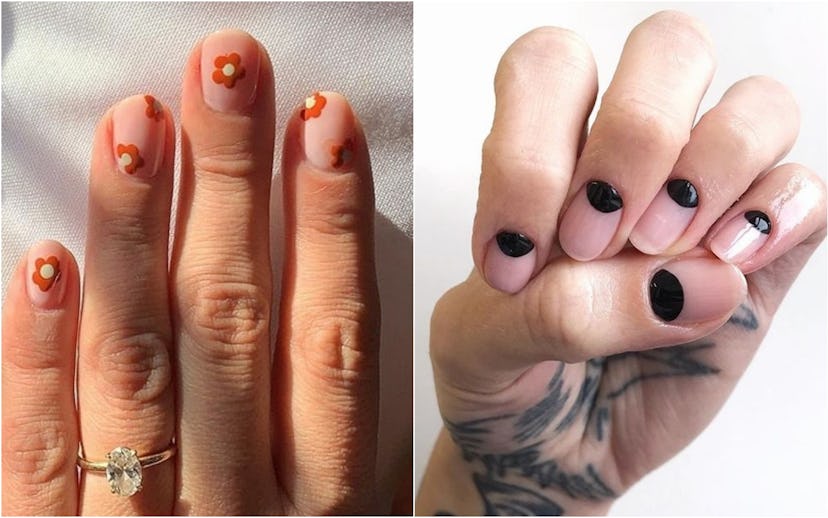
At-Home Nail Art Idea: Dotted Flower Nails
According to Hike Clerb founder and content creator, Evelynn Escobar-Thomas, dotted flower nails are an easy look to accomplish sans a nail tech. "I created these on my natural nails, so all you need to do is start with a primer and then get to dotting," she says, noting that, to create the dots, she used a dotting tool which you can pick up from most beauty stores or online at Amazon. If you don't have a tool — and don't feel like waiting for one to be delivered — Escobar-Thomas suggests using a toothpick or bobby pin. "If you're using a 'homemade' tool, be sure to delicately tap the dots on your nail to ensure the proper shape comes out," she adds. "I use one color for the middle and another for the petals." As with all designs listed here, let the nails dry and finish with a top coat.
At-Home Nail Art Idea: Abstract Nails
Nargis Khan, a Toronto-based nail artist for Tips Nail Bar, says that abstract manicures offer a "high-impact" design that tends to look way more difficult than it actually is to achieve. "You can't make mistakes with this one, anyone can do it," she assures. "With the skinny side of a [nail] brush, use light-handed pressure to achieve a brushstroke. Start by painting from the tip of the nail and end toward the middle. Repeat with each color in any sequence and let it dry." Khan suggests then dropping a tiny bit of contrasting polish on tin foil and, using the dotting tool, creating a cluster of random dots on each nail. "The more uneven and imperfect, the better," she says.
At-Home Nail Art Idea: Leopard Nails
"This look is super-easy," beauty expert and brand consultant Julia Talisman tells NYLON of the leopard nail. "It's best to use a dotting tool, but, if you don't have one, a toothpick or Q-tip [minus the cotton] will do." She suggests starting by painting the nails with a clear base, letting them dry completely, and then choose two contrasting polish colors for the actual design. "Spill a puddle of color 1 onto a small piece of tin foil. Dip your toothpick into it and dab onto the nail to create a blob-like shape," she says. "Create a few of these blobs on each nail, making sure the spots aren't too close together. After color 1 dries, spill a puddle of color 2 onto the tin foil. Dip a new toothpick into it and surround each blob with smaller blobs. Don't worry if it looks messy — leopard spots aren't perfect."
At-Home Nail Art Idea: Half-Moon Nails
"We love how easy this delicate, pretty half-moon design is to achieve at home," Juanita Huber-Millet, founder of London-based TOWNHOUSE nail studio, tells NYLON. "You just need a little patience and some handy tools." Hubber-Millet says to start with a good base coat. If you're a beginner to doing your own nails, this trend might be best executed with the help of a Hole Reinforcer Label, which you can get for under $4 at Staples or Amazon. You'll use the small label over the bottom of your nail to create the half-moon shape. "Paint two coats of your favorite varnish color over the top of your nail all the way down to the edge of the circle," she instructs, saying to follow by carefully removing the hole-punch circle. "It won't be perfect, but you should have the rough shape. To tidy things up, get a rounded brush, dip it in nail varnish remover and carefully wipe around the half-moon to create a clean circle." Should you feel up to the challenge, you can freestyle the half-moon shape with a regular nail brush or bobby pin.
At-Home Nail Art Idea: Color-Blocked Camo Nails
According to Escobar-Thomas, creating this color-blocked camo look only requires the brush inside your nail polish bottle. "You start by painting your base. Then, you make your 'spots' using a second color. Lastly, you outline those spots with a third color leaving some edges exposed," she says.
At-Home Nail Art Trend: Multi-Colored Nails
The (now) tried-and-true tonal, multi-colored manicure might just be the easiest look to complete at home, so long as you have two or more shade options at home. If you want to go for a more intentional color scheme, nail care brands and studios have started to sell sets for this exact purpose, like the Paintbox Power Couples and the Nails Inc. Keep It Tonal collection.
At-Home Nail Art Ideas: Cow Print Nails
Phoebe of Nails By Phoebe says the popular cow-print look can be DIY'd, too. "Apply white or any other colored polish onto your nails and allow to dry," she starts. "Then, dip a dotting tool or anything with a rounded tip into black polish. Starting off with a generous amount of polish on your nail, carefully and gently drag it out from the corners, making it appear more like a cow print." Phoebe says to make as many cow prints as you wish on each nail — sharing an example that sees them as just accent nails or tips. "Don't worry if you don't think it looks right, cow prints aren't all the same!"
